My Blinkies


Places I ♥


August 24, 2011
A Thousand Stars

A Thousand Stars
This tutorial was written for those
Who have a working knowledge of PSP
Supplies Needed
PSP- I used X3
But any version should work
Font of choice or the one I am using: Marela
Scrap kit of choice or you can get the one I used here
I used A Thousand Stars by iMagic Reflections
Mask of choice
Plugins: Xero-Frittilary, Xero-Radiance
Artwork is ©Legends Art
You can purchase his artwork at SATC
Open a new image
600x600
You can resize later
Open frame 08
Copy-Paste as new layer
Image-Resize
Resize 85%
Move towards the upper left corner
Open frame 05
Copy-Paste as new layer
Image-Resize
Resize 85%
Move towards the bottom right corner
Grab your background eraser
Erase the parts of frame 05 that overlap frame 08
Merge Down so that both frames are now 1 layer
Grab your magic wand
Click inside both frames
Selections-Modify-Expand
Expand by 5
Open paper 02
Copy-Paste
Paste as new layer
Activate frame layer
Selections-Invert
Back on paper 02 layer
Click delete on keyboard
Move under the frame layer
Select none
Drop Shadow the frame layer
Activate the paper layer
Plugins-Xero-Fritillary
Set to your preference
Grab your magic wand
Click inside the top left frame
Selections-Modify-Expand
Expand by 5
Grab the close up tube
Position to your liking
Activate the frame layer
Selections-invert
Back on the tube layer- delete on the keyboard
Select none
Duplicate the close up
On the original close up layer
Adjust-blur-gaussian blur-3
On the top close up layer
Change the blend mode to Soft Light
Or one of your choosing
Merge down
Lower opacity to 75
Move below frame layer
Repeat the above steps for the lower right frame
Open your main tube and place to your liking
Duplicate tube
Bottom layer- Adjust/Blur/Gaussian Blur-3
Top tube layer- Xero Radiance-set to your liking
Change the blend mode to overlay
Choose a paper
Copy-Paste as new layer
Move to the very bottom
Apply a mask of choice
Merge group
Resize if you need too
Add your copyright information
Add your name
Your finished!!!!


June 11, 2011
Kiss My Attitude Tutorial

Kiss My Attitude
This tutorial was written for those
that have a working knowledge of PSP
Supplies Needed
PSP- I used X3
But any version should work
Font of choice or the one I am using:
Template from Creative Misfits Collab Kristin and Kat which you can get HERE
Scrap kit of choice or you can get the one I used by Alika’s Designs at So Sweet Scraps
The kit I am using is AS Bite Me
Mask of choice
Plugins: Xero-Radiance
Artwork is ©Susan Justice purchased through UpYourArt. However this specific tube is an exclusive commissioned tube for PSP Party Central.
Lets Begin!
Open the template-Shift D to duplicate-close original
Change the canvas size
You can resize later if you need to!
Delete the Copyright layer
Highlight white square one
go to selections – select all – float – defloat
Open Paper18
Copy and Paste as a new layer
selections – invert – select none
Delete white square one
repeat above steps for copy of white square two
Select the radiating layer
choose a color from your tube
grab your magic wand
click in the center of the radiating layer
flood fill with color of choice
Select the pink circle frame
Selections-Select All-Float-Defloat
new layer – flood fill with color of choice
Selections-Select None
Delete the original pink circle frame
go to adjust – and add/remove noise – add noise
with the following settings
Uniform – Monochrome – 100
Highlight the Aqua Circle Layer
Selections-select all-float-defloat
Copy and Paste paper 12 as a new layer
Selections-invert
Delete on the keyboard
Select None
Delete Original Aqua Circle layer
Highlight white rectangle
Selections-select all-float-defloat
Copy and paste paper 17
Selections-invert
Delete on Keyboard
Select none
Delete original white rectangle layer
Highlight the rectangle layer you just made
Go to adjust-add/remove noise-add noise
Same settings as before
Repeat above steps for white rectangle 2
Highlight the white circle layer
Selections-select all-float-defloat
Copy and paste paper 10 as a new layer
Selections-invert
Delete on the keyboard
Select none
Delete original white circle layer
Delete lips layer
Highlight the circle layer you just did
Selections-Select all-float-defloat
Copy and Paste tube of choice as a new layer
Position above your circle layer
Selections-Invert
Delete on the keyboard
Select None
Duplicate tube layer
On original tube layer – go to adjust-blur-Gaussian blur
Radius of 3.00
Go to copy of tube layer
Plugins-xero-radiance
Settings of choice
Change blend mode to hard light
Add elements of choice
Resize if needed
Add your copyright information and license number if one is required
Add your name
Safe and your done!
May 31, 2011
I Got A Rockin Award!!

SWEET I got an award!!!
Thank you Sarah for choosing me for the award!
You can find her awesome blog here!
This award is to acknowledge blogs that rock.
If you know a blog that rocks and want to give them this award
Then send them a message saying..."Your Blog Rocks".
Since I have accepted this award from Shadow's Creations,
I must pass it on to 5 other blogs that I think Rock.
There are no rules to this award.
Only to send it to 5 people you think deserve this award.
Make sure you leave them a message.
The 5 blogs I pick are as follows:
1. Brulicious Designs
2. Addictive Pleasures
3. Marie's Palace Of Tuts!
4.Fiona Devil's Blog
5.Sweet Southern Comfort Creations
Blog Award

OMG! I just got an Award!
Thank you so much ♥Cheryl♥!
Visit her blog
The aim of the award is to
bring recognition to blogs with minimal followers.
Since I have accepted the award I must pass it on to
at least 3 other blogs (but not more than 5),
that have inspired me and I feel deserve a bit more attention.
The rules are to say thank you on my blog
to the one who passed it on to me
and link to their blog (see above).
Pick the blogs to pass the award on to,
leave a note on their blog and then list them with links to their blogs...
here are the blogs i choose:
May 19, 2011
Problem Child Tutorial

Problem Child
This tutorial was written for those
that have a working knowledge of PSP
Supplies Needed
PSP- I used X3
But any version should work
Font of choice or the one I am using: NightWarrior
Template by Brulicious Designs which you can get here
Scrap kit of choice or you can get the one I used by DesignsBySarah at PMTwS here
I used Who Me
Mask of choice
Plugins: Xero-Fritillary
Artwork is ©Zlata_M purchased through PicsForDesign
Lets Begin!
Open the template-Shift D to duplicate-close original
You can resize later if you need to!
Delete the Copyright layer
Make sure the black circle layer is active
Selections-Select All-Float-Defloat
Open paper sb_pmt_who-me_pp11 or paper of choice
Copy-Paste as new layer
Selections-Invert
Click delete on the keyboard
Select None
Delete original black circle layer
Plugins-Xero-Fritillary
With the following settings
10,30,10,0
Activate left gray rectangle layer
Selections-float-defloat
Open paper sb_pmt_who-me_pp6 or paper of choice
Copy-Paste as new layer
Selections-Invert
Click delete on the keyboard
Delete original layer
Repeat above steps for the right gray rectangle layer
Activate right rectangle layer
Selections-select all-float-defloat
Add new layer
Modify-select selections borders width 4
Click ok
Flood fill white or color of choice
Adjust-Add/Remove Noise-Add Noise/Uniform-100
Repeat for left rectangle
Activate skull brushes layer
Selections-Select All-float-defloat
Open paper sb_pmt_who-me_pp5 or paper of choice
Copy and Paste as new layer
Selections-Invert
Click delete on the keyboard
Delete the original skull brushes layer
Drop Shadow of choice
Open Elements of choice
Place them where you like
Add drop shadows as needed
Activate the Problem wordart layer
Selections-Select All-Float-Defloat
Selections-Select All-Float-Defloat
New layer
Flood fill with a color from your tube
Select none
Delete the original problem wordart
Do the same for the child wordart
Paste tube as new layer
Place where you want
Duplicate
Original tube layer-Blur-Gaussian blur-3
Activate the duplicate tube layer- Change blend mode to Overlay
Drop shadow if needed
Resize to your liking
Add Copyright information
Place your license number if needed
Add your name and you are done!
May 13, 2011
No Drama Tag
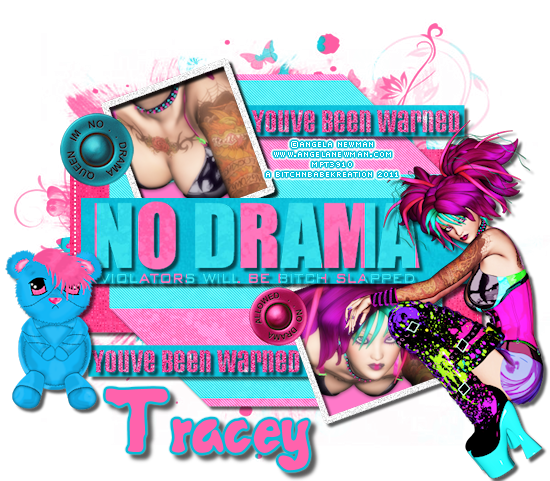
I made this tag yesterday using the kit Drama by Tracey of Broken DreamZ Scrapz.
You can purchase the kit at Taggers Dreamz !
Thank you Tracey for allowing me to use this awesome kit to make a tag!
I will be writing the tutorial and posting it soon for this tag!
Hugs
Jessica
Subscribe to:
Posts (Atom)


